Introduction
When I first launched my blog, I learned that speed and security were very important, but I didn’t realize just how much a tool like Cloudflare could make a difference.
After trying other solutions, I realized I needed something that would not only protect my site but also enhance its performance. And that’s when I found Cloudflare…
Table of Contents
What is Cloudflare?
Cloudflare is a CDN (Content Delivery Network) that acts like a shield between your visitors and your website. It speeds things up by storing copies of your site on servers around the world, so people can access it quickly, no matter where they are. Plus, it helps stop bad traffic from overwhelming your site with attacks like a DDoS attack, keeping your data safe.
I started using Cloudflare because I wanted to make my website faster and more secure without any complicated setup. At first, I wasn’t sure if I needed all its features, but once I saw how much it improved my site’s performance and protected it from attacks, I was sold.
Even if you’re not tech-savvy, Cloudflare makes it easy to keep your website running smoothly and securely.
Why is Website Security Important?
Website security is crucial for maintaining the integrity and trustworthiness of your online presence. With increasing cyber threats, such as data breaches and DDoS attacks, ensuring robust security measures protects sensitive information and prevents downtime. A secure website not only safeguards user data but also enhances your site’s credibility, fostering customer trust and loyalty. Implementing solutions like Cloudflare can significantly bolster your website’s defenses, making it resilient against malicious activities while improving overall performance.
And you should also combine Cloudflare with another great tool in website security, which can further improve the security of your website, check out my review about MalCare, it has friendly user interface, robust and up-to-date techniques to handle recent cyber attacks and much more.
How Cloudflare Improves Website Speed
When you first start using Cloudflare, you will notice how faster your website became instantly. And here’s why:
Global Content Delivery Network (CDN)
Cloudflare has a large network of servers around the world. This means:
- Faster Load Times: Your website content is stored closer to your visitors, so they can access it quickly.
- Reduced Latency: By minimizing the distance data has to travel, Cloudflare cuts down on lag time.
Smart Caching
Cloudflare automatically caches your website’s static content. This includes:
- Images, CSS, and JavaScript: When a visitor accesses your site, they get these elements from Cloudflare’s servers instead of waiting for your main server to deliver them.
- Less Strain on Your Server: With fewer requests hitting your server, it can handle more traffic without slowing down.
Performance Optimization Features
Cloudflare offers several tools to boost speed, such as:
- Auto Minification: It reduces file sizes by removing unnecessary characters from your code, making it load faster.
- Image Optimization: Cloudflare can compress images without losing quality, which significantly speeds up loading times.
Real-Time Analytics
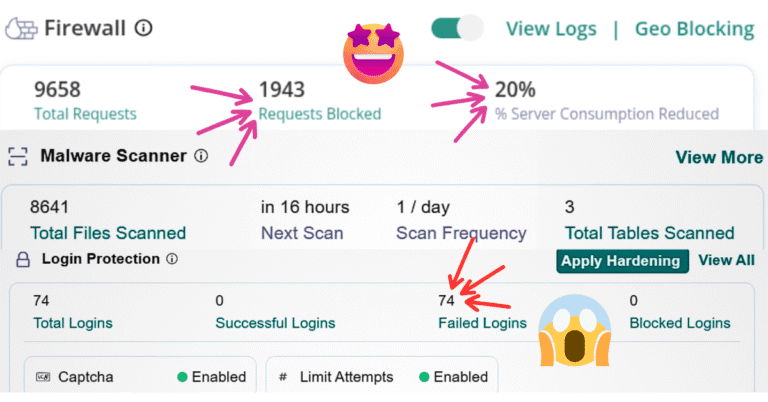
After implementing Cloudflare, I noticed:
- Traffic Insights: I could see exactly how much faster my site was running and where visitors were coming from.
- Performance Monitoring: It helped me identify areas for improvement and track the impact of changes I made.
Cloudflare’s Security Features: How It Keeps Your Website Safe
Keeping your website secure is just as important as making it fast. That’s where Cloudflare shines. Here’s a breakdown of its key security features, explained in simple terms:
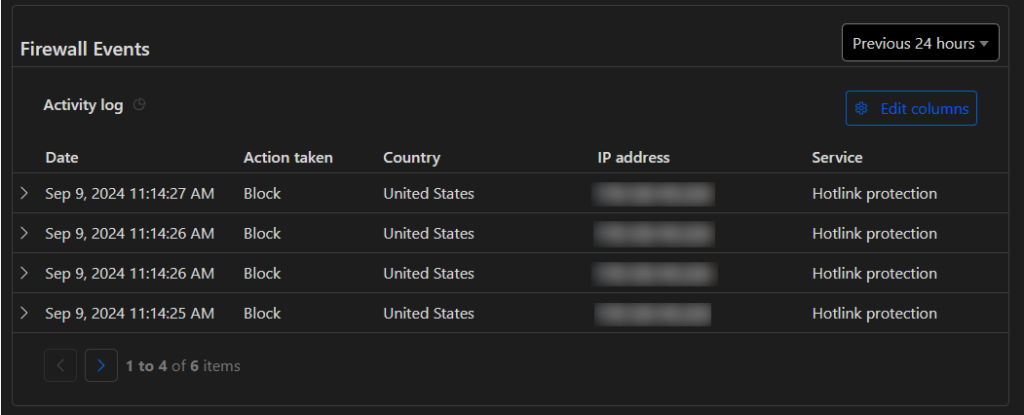
DDoS Protection
Cloudflare helps protect your site from DDoS (Distributed Denial of Service) attacks, where bad actors try to overwhelm your server with traffic. Here’s how:
- Automatic Defense: Cloudflare detects and mitigates these attacks in real-time, so your site stays online even during an attack.
- Scalable Resources: Its massive network can absorb traffic spikes, ensuring legitimate visitors can access your site without interruption.
Web Application Firewall (WAF)
The WAF acts like a security guard for your website. Here’s what it does:
- Filters Out Bad Traffic: It blocks harmful requests before they reach your site, protecting against common threats like SQL injection and XSS (Cross Site Scripting) attacks.
- Customizable Rules: You can set specific rules based on your needs, tailoring the protection to your website.
And yes, you’ll get these attacks daily:
SSL/TLS Encryption
With Cloudflare, your website can use SSL/TLS encryption, which keeps data secure. And that’s important for your credibility. This means:
- Secure Data Transfer: Visitors’ information, like passwords and credit card details, is encrypted, making it harder for hackers to intercept.
- Trust Signals: Having HTTPS shows visitors that your site is secure, boosting their confidence. Not only that, some browsers wont let your visitors access your website if it is not SSL/TLS encrypted, leading to traffic lose.
Bot Management
Not all bots are bad, but some can cause trouble. And you don’t want to block or stop the good bots by mistake either, for example the Google bots that helps in indexing your website, Cloudflare helps you manage them by:
- Identifying Good vs. Bad Bots: It can distinguish between helpful bots (like search engine crawlers) and malicious ones that try to scrape data or launch attacks.
- Blocking Harmful Bots: You can set rules to block or challenge suspicious bots, reducing unwanted traffic.
Real-Time Threat Intelligence
Cloudflare constantly monitors threats across its network. This means:
- Up-to-Date Protection: It learns from attacks happening on other sites and can quickly apply that knowledge to protect yours.
- Insightful Reports: You’ll receive reports on attempted attacks, so you can understand the security landscape of your site.
How To Setup Cloudflare?
Setting up Cloudflare for my blog was surprisingly straightforward. I was a bit intimidated at first, but thankfully the process turned out to be user-friendly. Here’s a simple guide based on my experience, along with step-by-step instructions to help you get started.
Step 1: Sign Up for Cloudflare
- Visit Cloudflare’s Website: Go to Cloudflare.com.
- Create an Account: Click on “Sign Up” and enter your email and a password.
Step 2: Add Your Website
- Enter Your Domain: After signing up, you’ll be prompted to enter your website’s domain name, If not you’ll find “Add site” at the top of the dashboard.

2. Select a Plan: Choose a plan that suits your needs. The free plan is a great starting point!
Step 3: Configure DNS Settings
- Scan for DNS Records: Cloudflare will automatically scan your current DNS records. This usually takes just a few seconds.
- Review Records: Check that all your DNS records are correct. You can add or edit records if needed.
How To Setup DNS Settings Manually
If somehow Cloudflare didn’t add the records automatically you can add them manually by going to your hosting provider support, and ask them to give you instructions on how to do so. However if your using Hostinger then you can follow these steps below:
- Go to the Hostinger‘s panel at: https://hpanel.hostinger.com/ > ‘Websites’ (on the left panel) > ‘Dashboard’ (next to your website name) > ‘Hosting Plan’ (on the left panel) > ‘Plan details’
- In the ‘Plan details’ copy your Website’s IP address.
- Now for email sending and receiving configuration (if you need them) go to ’emails’ (On the left panel) then ’email accounts’ and click manage.
- Go to ‘Connect Domain’ (On the left panel) and under ‘Receive emails’ copy the two ‘Value’ and ‘Priority’ these are for the MX record
- In the same page go to ‘Increase email deliverability’ under ‘Expected records’ copy ‘Name’ and ‘Value’ of 1, 2 and 3 and let’s call them A B and C
- Now in ‘Protect your reputation’ under ‘Expected records’ copy ‘Value’ and lets call it SPF.
- Now to ‘Message authentication’ copy ‘Name’ and ‘Value’. let’s call it dmarc
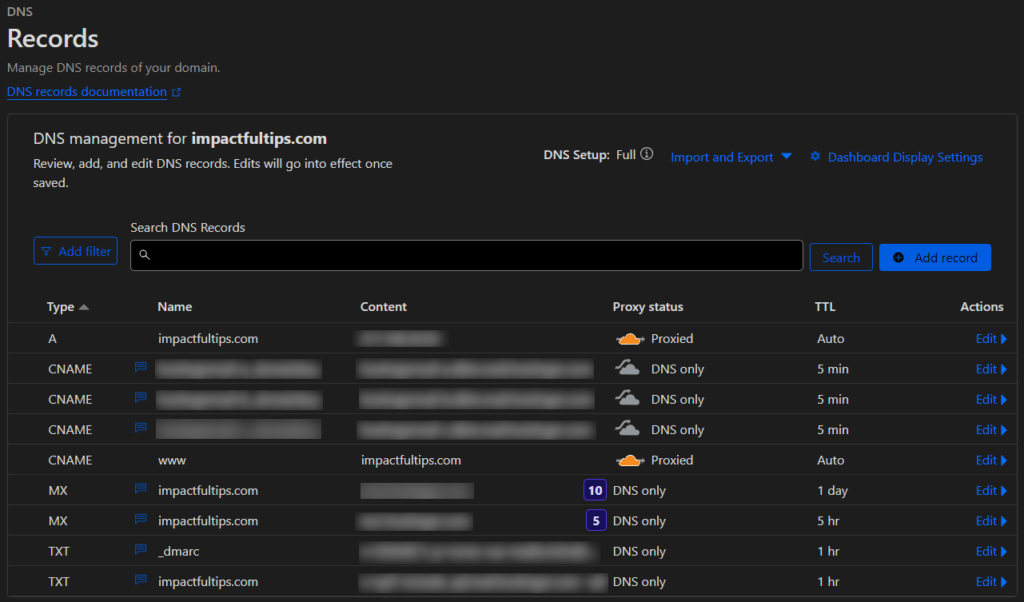
- Now go back to Cloudflare records section and add new records as follow:
| Type | Name | Content | Priority | Proxy status | TTL |
| A | your-website-name.com | your Website’s IP address | n/a | Proxied | Auto |
| CNAME | www | your-website-name.com | n/a | Proxied | Auto |
| CNAME * | A ‘Name’ | A ‘Value’ | n/a | DNS only | 5 min |
| CNAME * | B ‘Name’ | B ‘Value’ | n/a | DNS only | 5 min |
| CNAME * | C ‘Name’ | C ‘Value’ | n/a | DNS only | 5 min |
| MX * | your-website-name.com | MX ‘Value’ | MX ‘Priority’ | DNS only | 1 day |
| MX * | your-website-name.com | MX ‘Value’ | MX ‘Priority’ | DNS only | 5 hours |
| TXT * | _dmarc | dmarc ‘Value’ | n/a | DNS only | 1 hour |
| TXT * | your-website-name.com | SPF ‘Value’ | n/a | DNS only | 1 hour |
NOTICE:
1. No need to include http or https when you type your website name just like the example “your-website-name.com”, and could be .com or .net etc.. depending on what extension you have.
2. The Records with the * symbol are for email configuration, if your planning on using your domain email to send and receive emails, you’ll need those Records.
3. The orange colored values should be changed by going through the step by step above, since they are specific to you, this is why I highlighted them for you, the rest could be copied as is.
If you got confused about something or still have some trouble setting up the records, you can message me here, and I’ll help you figure it out.
Step 4: Change Your Nameservers
- Update Nameservers: Cloudflare will provide you with two nameservers. You’ll need to go to your domain registrar (like Hostinger or Namecheap) to update your nameservers to the ones provided by Cloudflare.
- Wait for Propagation: It may take a few hours for the changes to take effect, but often it’s much quicker.
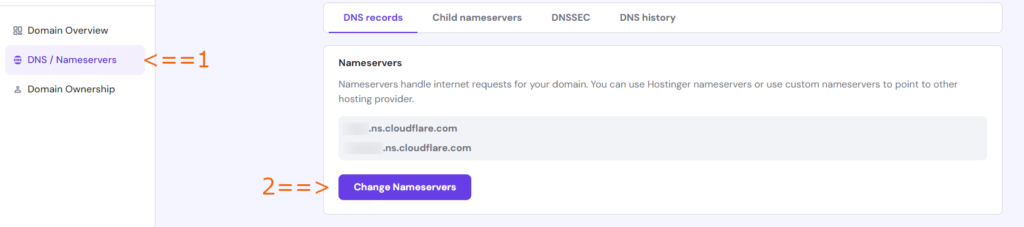
If your using Hostinger then here’s a quick step-by-step on how to do so:
- Go to your Cloudflare dashboard and click on ‘DNS’ on the left panel.
- Scroll down until you found ‘Cloudflare Nameservers’, we gonna need these two values that ends with ‘xxxxx.ns.cloudflare.com’.
- Now open Hostinger‘s panel at https://hpanel.hostinger.com/ > Click on ‘Domains’ (On the left panel) > and ‘Domain portfolio’ > Click ‘Manage’ next to your website name.
- On the same page head to ‘DNS / Nameservers’ (On the left panel) and click ‘Change Nameservers’, you can paste the two Nameservers you got from step 2 in there, and hit save.

Step 5: Configure Security and Performance Settings
- Dashboard Overview: Once your site is connected, you’ll see the Cloudflare dashboard.
- Adjust Settings: Here, you can tweak security settings, enable the CDN, and set caching options. I recommend starting with the default settings, which are generally effective.
My Experience
The entire setup process took me less than 30 minutes. I appreciated the clear instructions and the intuitive interface. Even if you’re not tech-savvy, Cloudflare guides you through each step. However, if you somehow got stuck in the setup process, please feel free to send me a message here, And I will try to help you ASAP!
Pros & Cons of Using Cloudflare
When considering Cloudflare for your website, it’s important to weigh the benefits against the drawbacks. Here’s a balanced overview based on my experience:
Pros
- Improved Website Speed: Cloudflare’s CDN accelerates load times by caching content closer to your visitors.
- Enhanced Security: With features like DDoS protection and a Web Application Firewall (WAF), Cloudflare helps keep your website safe from attacks.
- Easy Setup: The setup process is user-friendly, making it accessible even for those with limited technical knowledge.
- Free Plan Available: Cloudflare offers a robust free plan, providing essential features without any cost.
- Real-Time Analytics: You gain insights into traffic patterns and security threats, helping you make informed decisions.
- Automatic Updates: Cloudflare continuously updates its security measures, so you don’t have to worry about staying on top of threats.
Cons
- Learning Curve for Advanced Features: While basic setup is easy, some advanced features may require a bit of learning or technical knowledge to fully utilize.
- Potential Compatibility Issues: Some plugins or applications may not work seamlessly with Cloudflare, requiring additional configuration.
- Caching Delays: Changes made to your website might not appear immediately due to caching, which can be frustrating if you need updates to show quickly.
- Free Plan Limitations: While the free plan is great, it lacks some of the advanced features available in paid plans, which may be necessary for larger sites.
- Support Limitations: Free plan users have limited access to customer support, which might be a drawback if you encounter issues.
Conclusion
Overall, Cloudflare offers a wealth of benefits, especially in terms of speed and security. However, it’s important to consider the potential downsides, especially if you plan to use advanced features or if your website relies on specific plugins. Weighing these pros and cons can help you decide if Cloudflare is the right fit for your needs.
Cloudflare Pricing
Cloudflare offers a variety of pricing plans to cater to different needs, from personal blogs to large businesses. Here’s a breakdown of their main plans and my thoughts on whether it’s worth the investment.
Pricing Plans: Is It Worth the Investment?
- Free Plan: For anyone just starting out, the free plan offers fantastic value. It’s a great way to test Cloudflare’s benefits without committing financially.
- Pro Plan: At $20/month, the Pro plan is a reasonable investment for small to medium businesses. The added security features, can help protect your site from serious threats, making it worth the cost.
- Business Plan: Starting from $200/month, when your website handles sensitive information or experiences significant traffic, the Business plan provides robust security and support. The investment can pay off by preventing costly downtime or data breaches.
- Enterprise Plan: For large organizations, investing in the Enterprise plan may be essential for tailored support and advanced features that can handle high levels of traffic and security needs.
Conclusion
Overall, Cloudflare’s offers a variety of pricing plans that is competitive considering the range of features offered. For most users, especially those on the free or Pro plans, the benefits in speed and security far outweigh the costs. If you’re serious about protecting and optimizing your website, investing in one of Cloudflare’s plans is a smart decision!
Cloudflare Alternatives: Are There Any?
While Cloudflare is a popular choice for website speed and security, there are several alternatives worth considering. Here are a couple of them:
1. Akamai
Akamai is one of the largest content delivery networks (CDNs) and offers robust security features.
Pros:
- Extensive global network for fast content delivery.
- Advanced security options, including DDoS protection.
Cons:
- Generally more expensive than Cloudflare.
- May be more complex to set up and manage.
2. Fastly
Fastly is known for its real-time content delivery and edge cloud platform.
Pros:
- High performance and low latency.
- Real-time analytics and instant configuration changes.
Cons:
- Pricing can become high with increased usage.
- More suited for tech-savvy users who need advanced features.
Why I Chose Cloudflare
Despite these alternatives, I ultimately chose Cloudflare for several reasons:
- User-Friendly Setup: Cloudflare’s setup process was straightforward, making it accessible for someone without a technical background.
- Free Plan: The free plan offered a comprehensive set of features, allowing me to test its effectiveness without financial commitment.
- Balance of Speed and Security: Cloudflare provides a great combination of performance enhancements and security features that met my needs perfectly.
- Community and Support: The community around Cloudflare is robust, with plenty of resources and forums that helped me during the setup process.
In summary, while Akamai and Fastly have their strengths, Cloudflare’s ease of use, value for money, and strong performance made it the clear choice for my website.
Cloudflare Success Stories
Cloudflare has been instrumental in enhancing website performance and security for businesses across various industries. Here are a few notable case studies that highlight its effectiveness:
- Reddit:
Reddit utilizes Cloudflare to manage its immense traffic and protect against DDoS attacks. By implementing Cloudflare’s services, Reddit has successfully maintained uptime during peak usage, ensuring that users can access the site without interruption. The integration has also improved page load speeds, enhancing user experience. - Shopify:
As a leading e-commerce platform, Shopify relies on Cloudflare to secure its merchants’ online stores. With robust security features, Shopify has been able to protect sensitive customer data and prevent fraud. Cloudflare’s CDN capabilities have also accelerated loading times for shoppers, leading to higher conversion rates for merchants. - The British Broadcasting Corporation (BBC):
The BBC employs Cloudflare to handle vast amounts of traffic during major events, such as the Olympics. Cloudflare’s DDoS protection has safeguarded the BBC’s site from malicious attacks, ensuring that millions of viewers can access live streams without disruptions. This reliability has solidified the BBC’s reputation as a dependable source of information. - Mozilla:
Mozilla uses Cloudflare to enhance the security and performance of its websites, including Firefox. By leveraging Cloudflare’s services, Mozilla has improved load times and reduced latency for users around the globe. Additionally, Cloudflare’s security features help protect Mozilla’s sites from various online threats.
Major companies and websites must utilize some kind of security service because they know why is website security important and what is Cloudflare is capable of. From DDoS protection to speed enhancement and more…
FAQ
What Is CloudFlare Used For
Cloudflare makes your website load faster and keeps hackers away.
Think of it like a smart shield between your website and its visitors. When someone visits your site, Cloudflare checks them out first, blocks the bad guys, and then delivers your content quickly from a server close to them.
Final Thoughts: Should You Use Cloudflare?
In conclusion, Cloudflare is an excellent choice for anyone looking to enhance their website’s speed and security. With its user-friendly setup, robust features, and flexible pricing plans, it caters to a wide range of users—whether you’re running a personal blog or managing a large enterprise site.
Key Takeaways
- Speed Improvements: Cloudflare’s CDN significantly boosts load times, improving user experience.
- Enhanced Security: Features like DDoS protection and a Web Application Firewall help safeguard your site from threats.
- Cost-Effective Options: With a solid free plan and reasonably priced premium options, Cloudflare offers great value.
If you’re serious about optimizing your website and protecting it from online threats, I highly recommend giving Cloudflare a try. You’ll likely see a noticeable difference in both performance and security.
Sign up for Cloudflare today and start enjoying the benefits of a faster, safer online presence! And take your website to the next level.
Don’t hesitate to reach out if you have any questions or need assistance on how to setup Cloudflare or how to setup DNS settings—I’m here to help!